Labels

Monday, April 18, 2011

Passover seder cooking

Yes, again, it's been a while since I last posted but I've got good excuses: I actually really started working in that vegan restaurant (the one in Tel Aviv) in the kitchen, finally, and am on my way to becoming a true vegan chef.

In he meantime, my favorite hobby - experiments on human beings, weee!!

And this time, I've made three courses for this year' passover sedder which is held at my folks' place. One main course and two desserts:
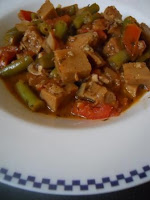


Italic green beans and seitan:

Working at the restaurant really brought my faith back in tofu and saiten as I have pretty much given up on making them taste like anything other than tasteless soy cheese and a rubber lump of protein. I learned some very nifty ways of greatly improving the taste and texture of both.

ingredients:

500 gr frozen green beans chopped
500 gr seitan
Soy sauce
Liquid Smoke
7 tomatoes diced
1/2 cup vegetable oil
1 1/2 tbs oregano
1 1/2 tbs thyme
1 1/2 tbs dry basil
1 tbs black pepper
1 tbs salt
1/2 cup water
1 cup cooking wine
3 medium onions, diced
20 gralics, crushed
1 tsp nutmeg
1/2 cup dry shiitake mushrooms

How to prepare:
In advance dice seitan to roughly 1cm by 1cm pieces. Soak them in a bowl or box filled with 1/4 soy sauce and 3/4 water with quite a few squirts of Liquid Smoke. Leave seitan to soak for at least an hour.

Fry onions and garlic until onion becomes golden. Add wine and continue to fry until all the liquid evaporates. Add tomatoes, green beans and water then cook to boil. Add spices and taste to adjust taste. Add shiitake and set aside.

When it's time, prepare a pan (or wok, it takes much less time) with a very thin coating of oil and fry seitan until it browns and changes texture. Add to the saucepan wih the tomatoes and beans with half a cup of the soaking water.

I know seitan is wheat and thus not very passover-friendly but my family doesn't really observe that bit...


Gluten-free banana icecream cake:

It was supposed to be completely raw but I added too much water to the dough mix so I had to bake it...Oh well...

Ingredients:

6 bananas, frozen
1 cup soaked brazil nuts
1 1/2 cup dry dates
1 cup oats
1/2 cup fresh mint leafs
1/2 tahini
1/4 tsp baking soda
1 tsp vanilla extract
cinnamon

How to prepare:

In a blender or food processor, grind dates, nuts and oats with water until mix is liquid but not watery. Add vanilla extract and baking soda. Thinly oil a cake pan or baking dish and pour dough mixture into it. Place in oven preheated to 180c for 10-15 minutes until a toothpick stuck into the dough comes out dry.

Put bananas, tahini and mint into blender and turn into a thick paste. Pour paste over the dough you just made, even top and lightly sprinkle cinnamon. Cover with cling film and stick into freezer until cake is served.


Raw strawberry-Almond dessert:

The dish I'm least happy with because the irish moss didn't give me the result I quite wanted, you can drop it all together if you want. It's tasty, don't get me wrong, it just the second time irish moss dissappoints me *goes off to corner to cry*

Ingredients:

300 gr strawberries
3 cups almonds soaked overnight
1/2 cup fresh mind leafs
3 tbs irish moss soaked overnight, two water replacements
2 tbs vanilla sugar
2 tbs lemon juice
3 tbs brown sugar

How to prepare:

Prepare almond milk from soaked almonds. In a blender, mash strawberries, lemon juice and brown sugar. Taste and adjust sugar and juice levels. Add the strawberries to the milk and in a blender, mix with irish moss. Add vanilla sugar and mint and blend. Keep in freezer if dessert is served a couple of hours from making or keep in refrigerator until served.

Here's a little buddy I met while making this dessert. I love being vegan.


Pessach sameakh!!

Friday, February 11, 2011

Iron bomb salad

Once, I bragged about my hemoglobin levels on my facebook and a (very distant) friend of mine, who runs a McDonald branch (I really hardly talk to her, she's just someone I know from university) complained that she can't understand how mine is so high and she's been anemic all these years while shoving red meat left right and center. Ever since then, my hemoglobin has become a source of hubris for me. I keep my iron sources and my calcium sources saparated almost religionsly and would suffer noddin off for hours after an iron-y meal, just because I can't drink anything caffinated yet.

My main source of iron (other than legume sprouts and leafy greens) is spirulina, which I'm getting from a lovely family in the Galile (I think) who ship 250gr bags in recycled breakfast cereals boxes. 250gr last me about three months, and since it's not even that expensive with shipping, I've got a pretty good deal. To any Israelis out there this is the website.

But the best way to make yourself absorb iron is eat it with a source of vitamin C, so that's where the salad comes in. It's a fruit salad, with at least two citrus fruits (very easy, now that it's winter time and they're in season) and this season there's also kiwifruit. Lately, I've perfected it and added some leafy greens to reel in the iron and amp the ntritional value. Here's the recipe:


Iron Bomb Salad:

1 apple
1 tangerine
1 orange/grapefruit
1 kiwifruit
1 banana
1 persimmon
2 lightly-boiled chard leafs, diced
1 celery stem, diced
leafs from 3-4 mint stems
1 hefty tablespoon raw sprirulina powder
1/4 teaspoon cinnamon

Dice ingredients and mix in a bowl. Ravish, yum yum. I usually have this for dinner, to top off the day.

Saturday, February 5, 2011

Choco-Cranny-Nutty cookies

Hello!!
Again, long time no post. I'm currently brewing something up but it's a three months' project so be patient :)

Anyway, I work in an alternative medicine college now and recently we've had an open day - a day candidates come to the college to hear about the various stuff we teach etc. So, the boss and other workers got all kinds of food lined up afor the buffet - fruits, vegetables, crackers and super-processed-food-cakes . I thought 'hang on, one of our majore diplomas are in healthy nutrition and here we are with these lumps of white flour and processed sugars? Nah!' so I made cookies, to balance it off.

I used a recipie for chocolate chip cookies I found on the net, changed the spicing and reduced the amount on chocolate chips to a third, replacing it with walnuts and cranberries to make it healthier. Here's what came out:


Choco-Cranny-Nutty cookies:

Pre-heat oven to 180c

Ingredients:
2 cups whole flour
1.5 teaspoons baking soda
0.5 teaspoon salt
2 teaspoon coffee hawaij
1 cup brown sugar
0.5 cup canola oil
1 teaspoon vanilla extract
0.25 cup water
1 handful of crushed walnuts
1 handful unsweetened dry cranberries
1 handful vegan chocolate chips

How to:

Easy peasy - mix dry ingredients (minus the chocolate, crannies and nuts) in one bowl, mix wet ingredients in another. Make a well in the middle of the dry bowl and slowely pour the wet ingredients in. Work the whole mixture together until it becomes a moist dark dough. Add yummies and keep stirring.
Thoroughly clean a large square of your cooking work station and flour it lightly (you can also use a sheet of cooking paper instead, I did as my roomates are extremely unhygenic in the kitchen). Plop the dough on it and flatten it with a roller. Use a cookiecutter (don't they look cheerful?) and place cookies on a baking sheet.
Now here's the tricky part. All I've got in my rented flat's kitchen (which is rather big, I'll give it that) is a toaster-oven with a heating coil on the top of the over and another on the bottom. What I did was switch the two baking rakes' places after five minutes so the cookies will get a baking from bottom to top for another six minutes. If you have a proper oven you don't need to do that. Around ten to twelve minutes would get the job done.
Take out the baking sheet and let the cookies cool before moving them to a box, plate or tummy.

P.S: sorry I haven't got any more pictures, I forgot to take some of the finished product :)

Friday, December 10, 2010

Tofu and sprouted mung meatballs


This week I was invited by a friend to a Hannukah party. Now this 'omnivourous' friend (physically, we're herbivores, but some people are in denial...) came to my birthday party at the glorious Buddha Burgers and relished the quishe I ordered and her veggie burger but for some reason she thought the only thing I could bring to a party was adamame. Then she said there would be a lot of non-vegan quishes and cheeses and stuff but I'll "surely find some salads to eat" (which I did, as it really was the only thing I could eat, besides bread but there's heaven in salad and bread). So I decided I'd give her a bit of a lesson in what vegans can make. And so, I made Beer Sheva cookies again and churned up a brand new recipe for meatballs. They were supposed to be fritters but I'm horrid at frying things and baking is so much better so why not?

Tofu and Sprouted Mung Meatballs

Pre-preperation: Sprout the mung beans. I did it two days in advance - one evening for soaking then the rest of the time for sprouting.

Ingredients:
600gr regular tofu
900gr (after sprouting) mung beans
1 medium onion, finely chopped
3 medium tomatoes,finely chopped
4 teaspoons gram masala
4 teaspoons sweet paprika
4 teaspoons cumin
4 teaspoons turmeric
1 glass steamed pease
1 glass steamed dwarf carrots, chopped
1 bunch finely chopped parsley
2 teaspoons black pepper
9 crushed preserved garlic (by preserved, I ean the way I told you about in the indian eggplants recipe)
2 teaspoons table salt


Place mung beans and tofu in a bowl or blender and churn them into an even mush. Then vegetables and spicing and mix well until all the spicing and all the ingredients are evenly mixed. You need to be very thorough with this because the spices are very strong and if you bite into an unmixed lump you'll be a very sorry cooky.


After a desasterous attempt at frying them, I placed the mixture in my cupcakes pans and shoved them in the oven at 200c for about 20 minutes. Make sure not to overcook them as they might turn out a bit dry. They're spicy and yummy and very, very filling.


Not that they got too much appreciation...some party-goers even dipped them in mayo and sour cream sauce. This made me spend the rest of the evening wishing the animal product fats and cholesterole would hurry up and clog their arteries :) I've got it from my mother that if people don't do with my food what I want them to I can get very violent. The hostess, mind you, was very nice and praising and kept trying to excite everyone about the amazing wonder of actual food made with no animal ingredients (!!) bless her soul.

Saturday, November 27, 2010

Beer Sheva cookies

This December, for the third year in a row, I'm participating in one of Livejournal's fancy rat community' secret santa game. I so happens that my secret santa is an Australian, what a lovely chance to try out a little twist on the famous Australian ANZAC biscuits!

The only problem is, I don't have any Golden Syrup around in my town or, in fact, anywhere in Israel I'm afraid. The original recipe also calls for butter, which is not vegan. So I had to do with replacements and that mean that I can't call them ANZAC biscuits because, by Australian law, you can't call them ANZAC biscuits unless you use the exact recipe. I decided if I'm going to do a tribute, I'll do it all the way, and used slightly different spicing too, to give it a good tang. In the end, I've decided to call the Beer Sheva cookies, after ANZAC's famous battle of Beer sheva (ignore Wiki's faulty spelling).


Beer Seva cookies

1 glass of whole flower
1 glass of rolled oats
1 glass of brown sugar
1 glass of coconut flakes
125gr of margarine (I used one made from canola oil with reduced trans fats)
4 tablespoons of date syrup
1 tablespoon baking soda
10 tablespoons water
1/2 teaspoon coffee hawaij

Mix all the dry ingredients in one bowl and all the wet ingredients in another. Add the baking soda to the wet ingredients and mix well.


Join the two bowls (preferably, the dry ingredients into the wet ingredients one) and mix thoroughly until an even, sticky mixture is formed. If necesary, add more water. Here's Freud, the roommate's cat checking out the progress of the cookies.


On a sheet of baking paper, place small walnut sized balls of the mixture with a teaspoon at a decent distance from each other and bake in the oven for ten to fifteen minutes (but keep a close eye on them!) at 180c.


Hope she (and her rat, Ivy) would like these cookies!

Saturday, November 13, 2010

Indian eggplant

Hello!!

Long time no see, eh? Don't ask. Just don't ask, you don't want to know what been going on lately that kept me from cooking or...well....doing anything positive with my life, actually. I did go to a Rocky Horror Picture Show screening, though, after six years of absence.

A-n-y-w-a-y!! The eggplant, for which we have gathered here today.

This is the first time I'm making anything with an eggplant. I used to not like them due to unripe eggplants tending to be a little tingly in your mouth and f*rty once they're through with you. There were some amazing eggplants in the marketplace this week so I decided I'll do something about it. I picked two shiny, light and firm eggplants (that's how you know they're good) and dragged them home. And here's what I did with them:


Indian Eggplant:
Pre-heat over to 180c

Slice eggplants into an inch-thick slices more or less, butt included. Spray the slices with salt and leave (preferably in the sun) for about half an hour. While you're waiting, prepare the spice mix.


For two large eggplant you'll need:
1/2 teaspoon turmeric
1/2 teaspoon cumin
1/2 teaspoon black pepper
1/2 teaspoon gram masala
*2 large garlic cloves, crushed
4 teaspoons lemon juice
2 tablespoons of canola oil (easy on the oil, eggplants drink it up like crazy)

Pat the slices dry and, with a coating brush, spread a nice coating of the spice mix on each side of the slice. Then, put in the over and bake for 15 minutes for each side of the eggplant. Yes, 15 minutes one side, then 15 minutes another. Do not forget this step or you'll have only half-baked eggplant and we're not in the 70s so being half-baked isn't cool anymore.


When done, you can serve these as they are or with tomatoes or tomato sauce, it aught to be really good.


* Here's a little trick I learned from the lovely Buddha Burgers to amp your garlic. When you buy a garlic head, separate the cloves and keep them in a mixture on 90% canola oil and 10% white cooking wine so they're drowned in it completely. Then whenever you need garlic, use these cloves. This with not only preserve your cloves but also really, really enhance their taste and you can use the oil and wine mix for the next batch of cloves! It's really great.

And here's what happened to my coating brush from the turmeric LOL

Wednesday, October 13, 2010

RIP Lucy ?/09/08 - 13/10/10

This morning I had to put my poor Lucy to sleep. She suffered from some form of brain damage, either a tumor or a stroke, and did not respond to medications. Last night she seemd to ahve given up life altogether.
Lucy was never a hppy rat - always neurotic and skittish, with hardly any friends and I never saw her play. She was a rescue rat and it seems the scars of her early life never left her.
At least she's not in any pain anymore.
Here is a link to a slideshow of all her pictures.